how to create local user accounts in windows 11 with step by steps 2026how to create local user accounts in windows 11 with step by steps 2026
How to Create Local User Accounts in Windows 11 (Step-by-Step Guide – 2026)
how to create local user accounts in windows 11 with step by steps 2026
Introduction
how to create local user accounts in windows 11 with step by steps 2026
Windows 11 allows you to create different types of user accounts so that multiple people can use the same computer safely and independently. One of the most important and commonly used account types is the Local User Account.
A local user account is an account that exists only on your computer. Unlike a Microsoft account, it does not require an internet connection or email address. In 2026, many users still prefer local accounts for privacy, security, offline use, labs, schools, offices, and troubleshooting purposes.
This guide explains everything you need to know about creating local user accounts in Windows 11, including:
What a local account is
Why you should use a local account
Different methods to create one
Step-by-step instructions for beginners and advanced users
Admin vs standard local accounts
Common errors and solutions
Best practices in 2026
What Is a Local User Account in Windows 11?
how to create local user accounts in windows 11 with step by steps 2026
A local user account:
Is created and stored only on the PC
Does not sync with Microsoft services
Does not require email or internet
Has its own:
Desktop
Documents
Settings
Apps (user-specific)
Local Account vs Microsoft Account
how to create local user accounts in windows 11 with step by steps 2026
Feature
Local Account
Microsoft Account
Internet required
❌ No
✅ Yes
Email required
❌ No
✅ Yes
Sync settings
❌ No
✅ Yes
Privacy
✅ High
Medium
Best for
Offline users, labs, offices
Home & cloud users
Why Create a Local User Account in 2026?
how to create local user accounts in windows 11 with step by steps 2026
People still choose local accounts in 2026 because:
🔐 Better privacy control
🧪 Ideal for testing and training
🏫 Schools and labs prefer offline accounts
👨👩👧 Multiple family members use one PC
🛠 IT admins need controlled access
🚫 No forced Microsoft sign-in
Requirements Before Creating a Local Account
how to create local user accounts in windows 11 with step by steps 2026
Before you start:
You must be logged in as an Administrator
Windows 11 must be activated
You should decide:
Account name
Password (recommended)
Account type (Standard or Administrator)
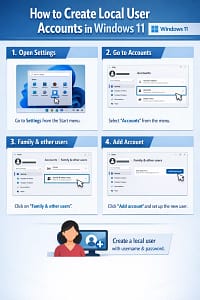
Method 1: Create a Local User Account Using Settings (Recommended)
how to create local user accounts in windows 11 with step by steps 2026
Creating a local user account in Windows 11 is simple, secure, and still highly useful in 2026. Whether you are a home user, student, office employee, or IT administrator, local accounts give you full control, privacy, and offline functionality.
By following the step-by-step methods in this guide, you can easily create, manage, and secure local user accounts on any Windows 11 PC.
You can create user accounts in Windows 11 using Command Prompt (CMD) very easily. Below is a clear, step-by-step guide with examples for local users and administrator users.
⚠️ Important
You must run Command Prompt as Administrator
Works on Windows 11 Home, Pro, Enterprise (2026 and later)
🔹 Step 1: Open Command Prompt as Administrator
Press Windows + S
Type cmd
Right-click Command Prompt
Click Run as administrator
Click Yes (UAC prompt)
🔹 Step 2: View Existing User Accounts (Optional)
net user
This shows all user accounts on your PC.
🔹 Step 3: Create a New Local User Account
Syntax:
net user username password /add
Example:
net user testuser 12345 /add
✔ This creates a standard local user named testuser.
🔹 Step 4: Create a User Without Password (Not Recommended)
net user testuser2 /add
You can set the password later.
🔹 Step 5: Create a User with Password Prompt (More Secure)
net user secureuser * /add
You’ll be asked to enter the password securely
Password will not be visible
🔹 Step 6: Make the User an Administrator
By default, new users are standard users.
Add user to Administrators group:
net localgroup administrators username /add
Example:
net localgroup administrators testuser /add
✔ Now testuser has admin privileges
🔹 Step 7: Remove User from Administrator Group (Optional)
net localgroup administrators username /delete
🔹 Step 8: Set or Change User Password
net user username newpassword
Example:
net user testuser New@123
🔹 Step 9: Delete a User Account
net user username /delete
Example:
net user testuser /delete
⚠️ This removes the account but does not delete user files in C:\Users
🔹 Step 10: Disable or Enable a User Account
Disable:
net user username /active:no
Enable:
net user username /active:yes
🔹 Step 11: Create User with Full Name & Description
net user username password /add /fullname:"Full Name" /comment:"Description"
Example:
net user officeuser Pass@123 /add /fullname:"Office Staff" /comment:"Accounts Department"
🔹 Step 12: Log In with the New User
Sign out or restart
Select the new user
Enter the password
🧠 Common Errors & Fixes
Error
Solution
Access denied
Run CMD as Administrator
User already exists
Choose a different username
Password complexity error
Use strong password (Caps, number, symbol)
✅ Summary
✔ Create local user
✔ Set or change password
✔ Grant admin access
✔ Enable/disable users
✔ Works offline (no Microsoft account needed)